This post contains affiliate links where I can earn a small commission.
Curious about kids knife skills? I am breaking down everything about kids knife skills, including safety, what knives kids should be using and age appropriate knife skills.

Let’s talk kids knife skills! Whether it’s learning to walk or riding a bicycle, there’s something so exciting about watching a child learn or master a skill for the first time. When you watch your child learn appropriate knife skills, their confidence in themselves will radiate from their entire being as they continue to practice and cook for you!
Now, take that into the kitchen — Imagine how confident they’ll be around knives with some guidance and practice.
Some kids (and adults, too) just have a knack for using knives. Most kids, however, require teaching and practice to perfect this skill, much like in the above walking and biking example.
I’m here to help you teach your child how to properly and safely use a knife for their age!
So what kind of knives should kids use and at what ages? Follow along as I break it all down for you. But first let’s talk about the basics. And please note that this is a recommendation. Use your parental intuition to know what is best for your child.
Kids Knife Skills Safety:
Safety is such a broad topic because there’s so much that can happen in the kitchen. Today I’m going to give you some tips on keeping your child safe in the kitchen — knife addition!
Knife Safety 101:
Follow these basic knife safety tips and then the steps to create a workable station at home that is safe and fun for kids!
- The sharper the knife, the better. This applies for older kids using a small pairing knife or a chef knife. Sharp knives need less force to cut than dull knives. This results in less damage to the food. Also, a dull knife slows you down, while a sharp knife makes the work easier. Need a knife sharpener? This is my favorite.
- Always hold knives down. Just like with scissors, don’t run with a knife, and always point the knife with the blade towards the ground. In case of any accidents, a knife wound to the foot or floor will be less detrimental than one in another part of your body.
- Don’t keep knives in the sink. The sink is a dangerous spot because it is hard-to-see-through water. Also, knives can rust when soaked in water, so simply hand wash and then dry to avoid rusting (and having to purchase new knives!). Running your knives through the dishwasher is a big no no, stick to hand washing.
Get Set Up:
Step 1:
- Secure the cutting board with a wet paper towel. All you need is a damp paper towel under the cutting board. This is used in professional kitchen and should be used every time you use a cutting board at home.
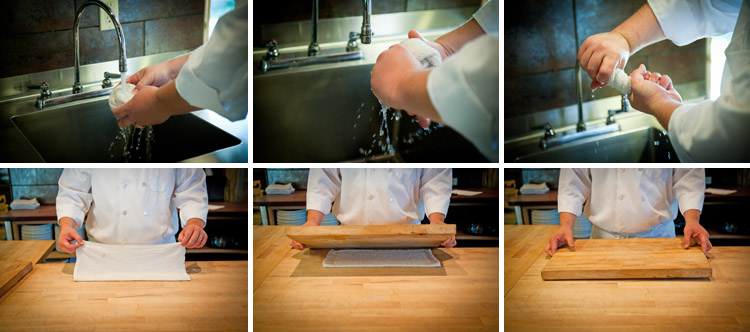
- Speaking of cutting boards, make sure you use the right cutting board. Using the right cutting board helps decrease contamination and will ensure a safe set up. I recommend a thick plastic or wooden cutting board. Thin, flimsy or glass cutting boards are not recommended and can cause damage to your knife and slippage.
- To prevent cross contamination don’t use the same cutting board for raw meat, seafood or dairy with fresh vegetables and fruits. Keep foods separate and wash the cutting boards with hot soapy water after each use.
Step 2:
- Use the correct knife. Using the correct knife is essential because each knife has a specific purpose. If you only have four knives in the kitchen, I recommend the serrated bread knife, a chefs knife, a utility knife and a paring knife. Those will handle just about anything in the kitchen.
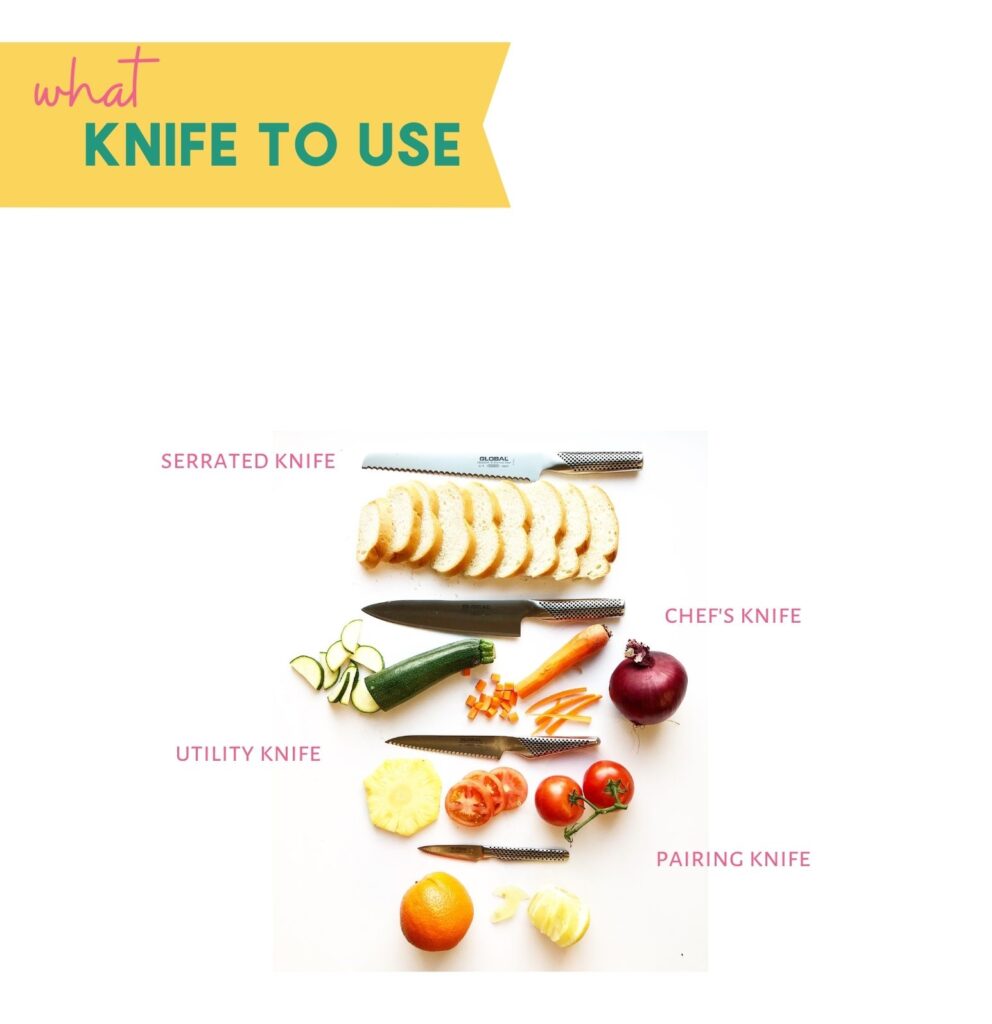
Which Knife To Use:
-
- Bread Knife — No more torn pieces of bread when this knife is used. It’s shape is designed to easily slice through bread without tearing it apart.
- Steak Knife — Leave the dinner knife for slicing your baked potato. Steak knives are great for, well, you guessed it — steak, as well as other cooked meats. Enjoy perfectly cut pieces of food on your dinner plate.
- Pairing Knife — Perfect for slicing small produce or more intricate cuts, such as segmenting citrus and berries, or even deveining shrimp!
- Tomato Knife — Ever wonder how restaurants get clean, crisp tomato slices? Use a knife specific for tomatoes for the same result at home.
- Chef Knife— This workhorse is known to do lots of prepping. Perfect for chopping and dicing all the things. You will use this
- Utility Knife — A heavy-duty knife that gets all the jobs done, from trimming to dicing to chopping.
- Santoku Knife — The knife that weighs less than its sibling, the chef knife, but still works just as beautifully and efficiently.
- Nakiri Knife — This looks like a butcher’s knife, but is great for chopping and slicing vegetables instead of meat. No need to saw or rock with this powerhouse!
- Carving Knife – Save this knife for your Thanksgiving turkey or Christmas ham! This is meant to glide through meat with little effort. Say “hello” to clean, uniform slices of meat at your next holiday gathering.
- Kitchen Shears— Technically not a knife, but just as sharp and as useful as one! Use these for cutting herbs, or foods into bite-size pieces.
Step 3:
- Make sure you are hip level to the counter. This is especially important for young children. They need to be on a steady, safe level to be able to cut properly. Hand eye coordination comes a little harder for children. This means they need to be able to apply the correct pressure when cutting through food. Having them hip level will help them to use their body weight and be able to cut through food more efficiently.
Step 4:
- Hold the knife properly. Hold the knife with your dominant hand (the hand you write with). Pinch the blade right above the handle and rest the knuckles of your pointer finger on the back of the knife.
Step 5:
- Do the chef stance. Stand on a steady surface with feet shoulder width apart. Make sure your hips are at counter height. Wear close toed shoes that are non-slip. Create an X with the tip of the knife and your claw hand. Elbows out.
Step 6:
- Always use the “claw” technique. This sounds funny, your kids will love the name, and you’ll love that their cute fingers are protected! Curl your fingers under into a claw to securely hold the item you are cutting.
Two main kids knife skills techniques:
There are two main knife skills that I teach children. The first is the claw and the saw. The second is the rocking the boat method.
The Claw and The Saw:
The premise behind this technique is that the hand holding the food is shaped like a claw, like the picture below, and therefore the knife can’t saw through any fingers that might be sticking out. The claw method works like a charm every time and will become the new way to hold food when prepping.

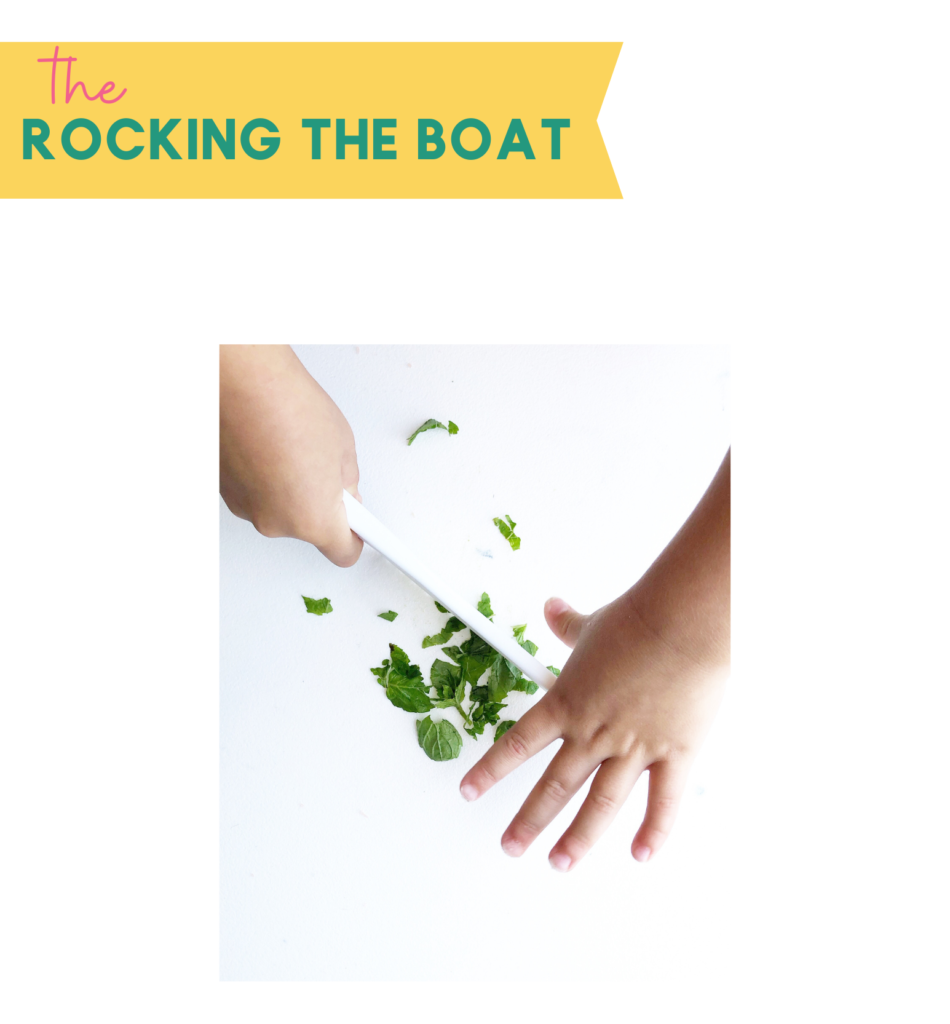
Rocking The Boat:
Rocking the boat is the second technique I teach. This is used for cutting herbs or mincing.
Instead of using the claw place your hand on top of the spine of the knife. Then rock the knife back and forth keeping the edge of the knife on the cutting board.
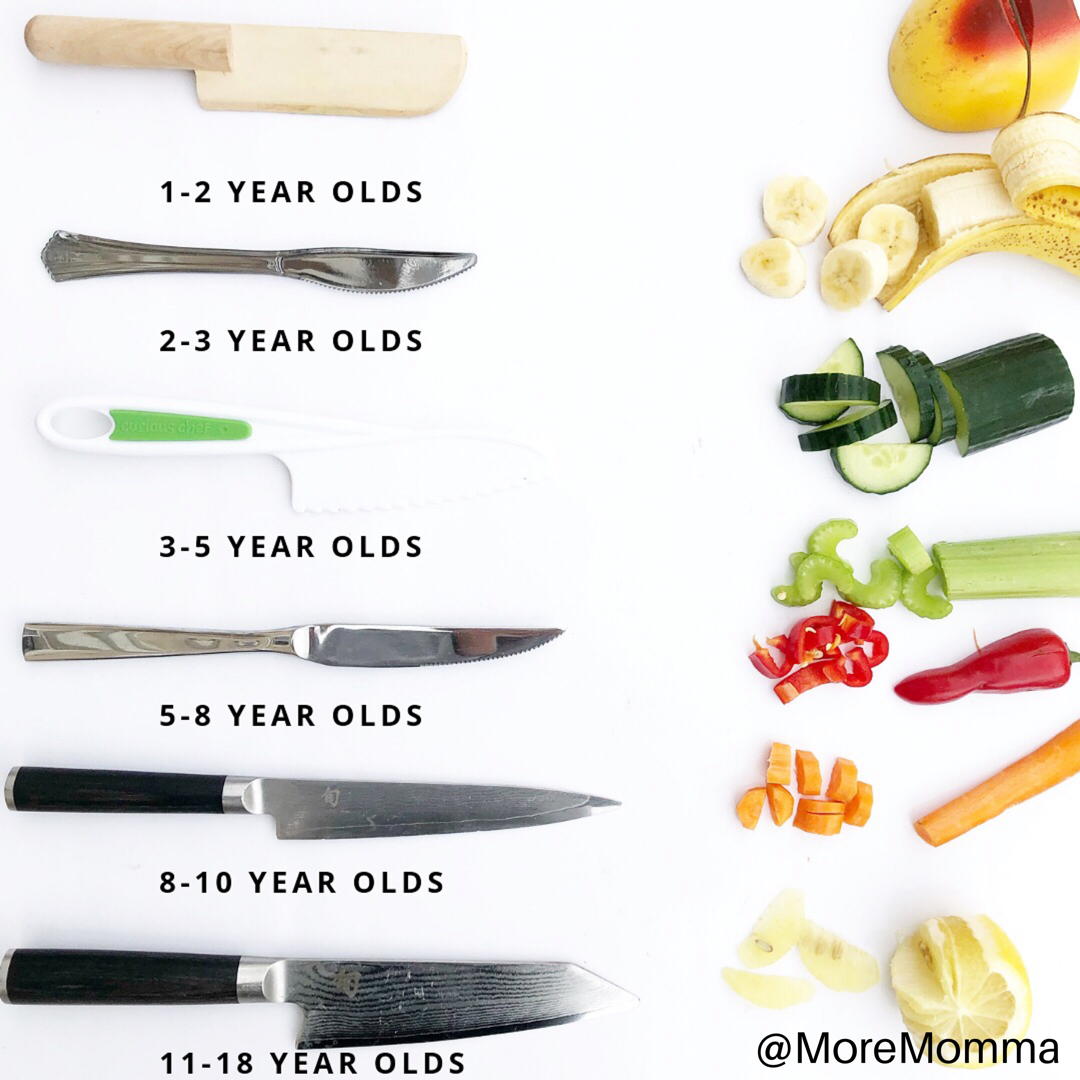
Kids Knife Skills By Age:
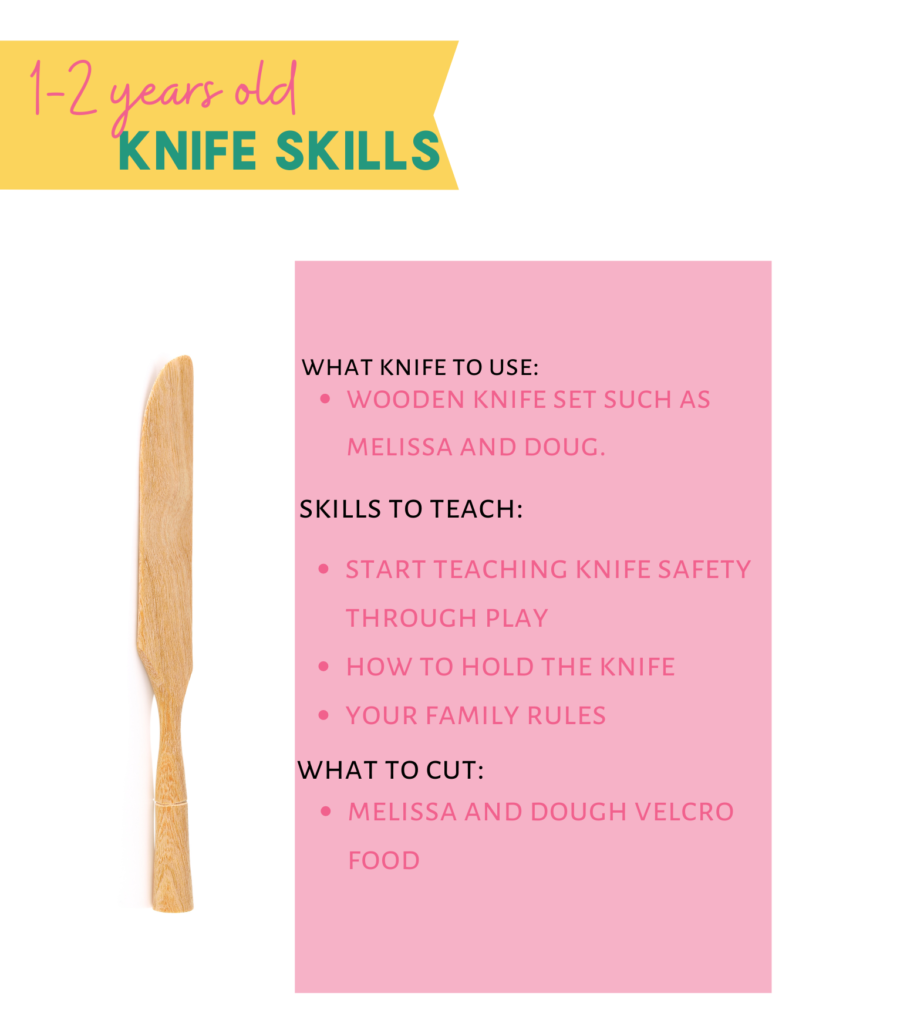
Ages 1-2 years old:
I start teaching my kids how to use a knife when they’re between 1-2 years old.
I keep it simple by using the Melissa and Doug wooden play knife with their wooden foods. Don’t worry about this age being too young to introduce knife safety (with age appropriate knives, of course). It’s really the perfect age — kids are beginning to explore, and love mimicking everything you do.
Ages 2-3 years old:
This is the perfect age for kids to use plastic knives to cut soft items, like bananas and play dough. While they’re having fun, start teaching them proper form and how to hold the knife.
You may want to invest in a learning tower at this age. A learning tower is a safe way to allow your child to get up to counter level. It is important that your child’s hips are at counter level when working with knives. 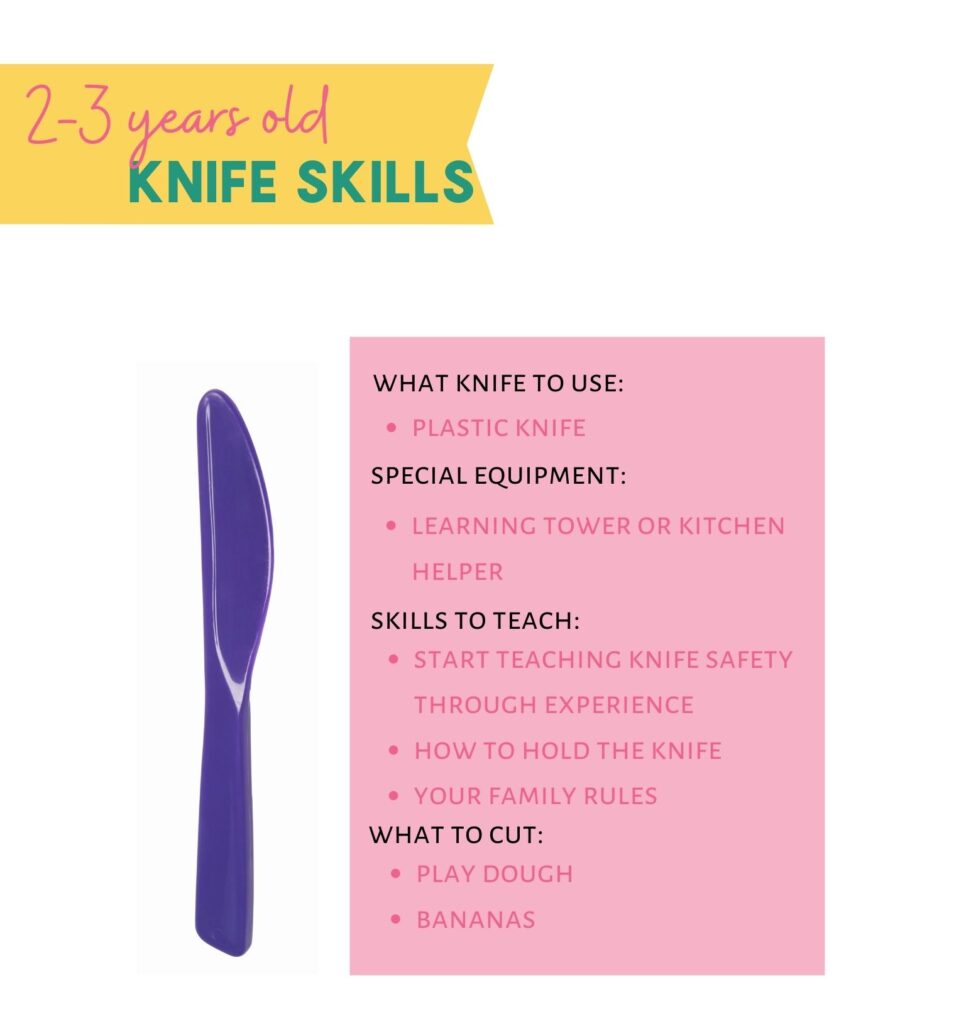
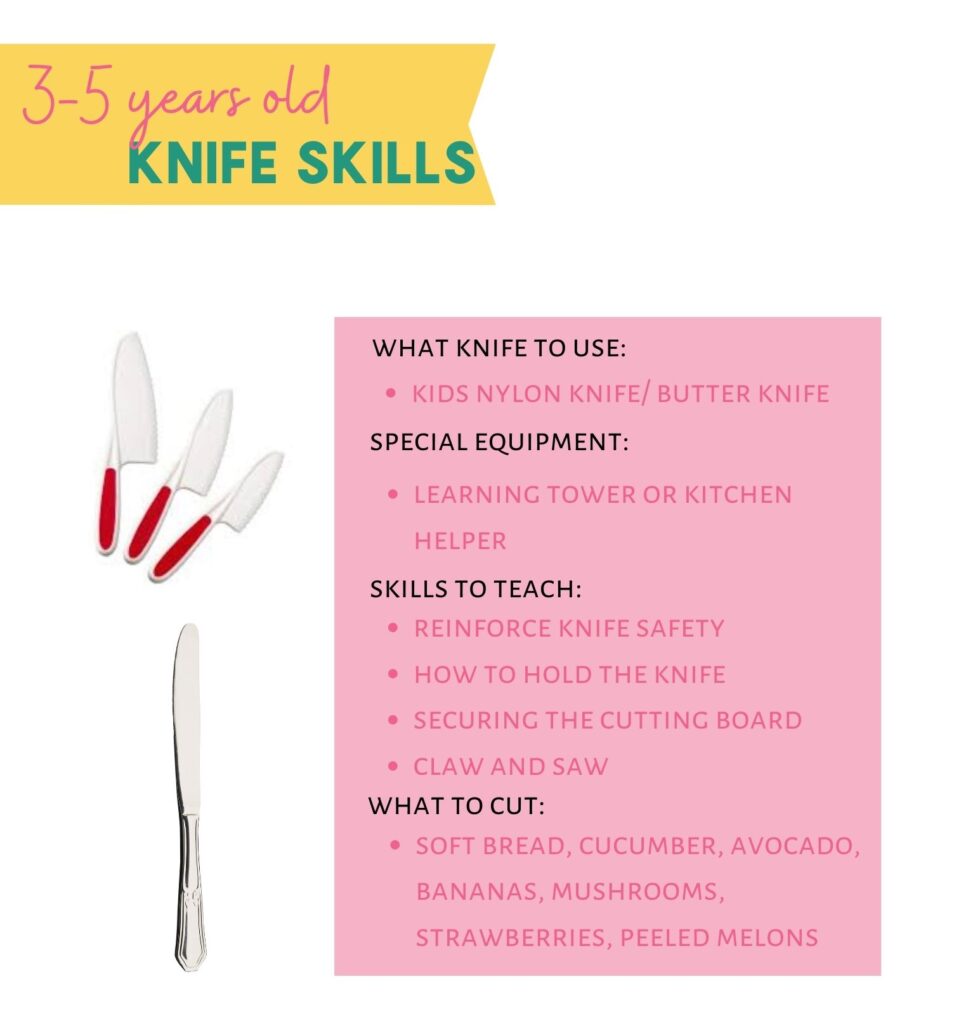
Ages 3-5 years old:
Have them use a kids nylon knife. They should learn the “claw” technique, along with rocking the boat.
The best foods for them to practice on are foods such as cucumber and celery. Avoid cutting hard items with this type of knife since it will not be able to cut through.
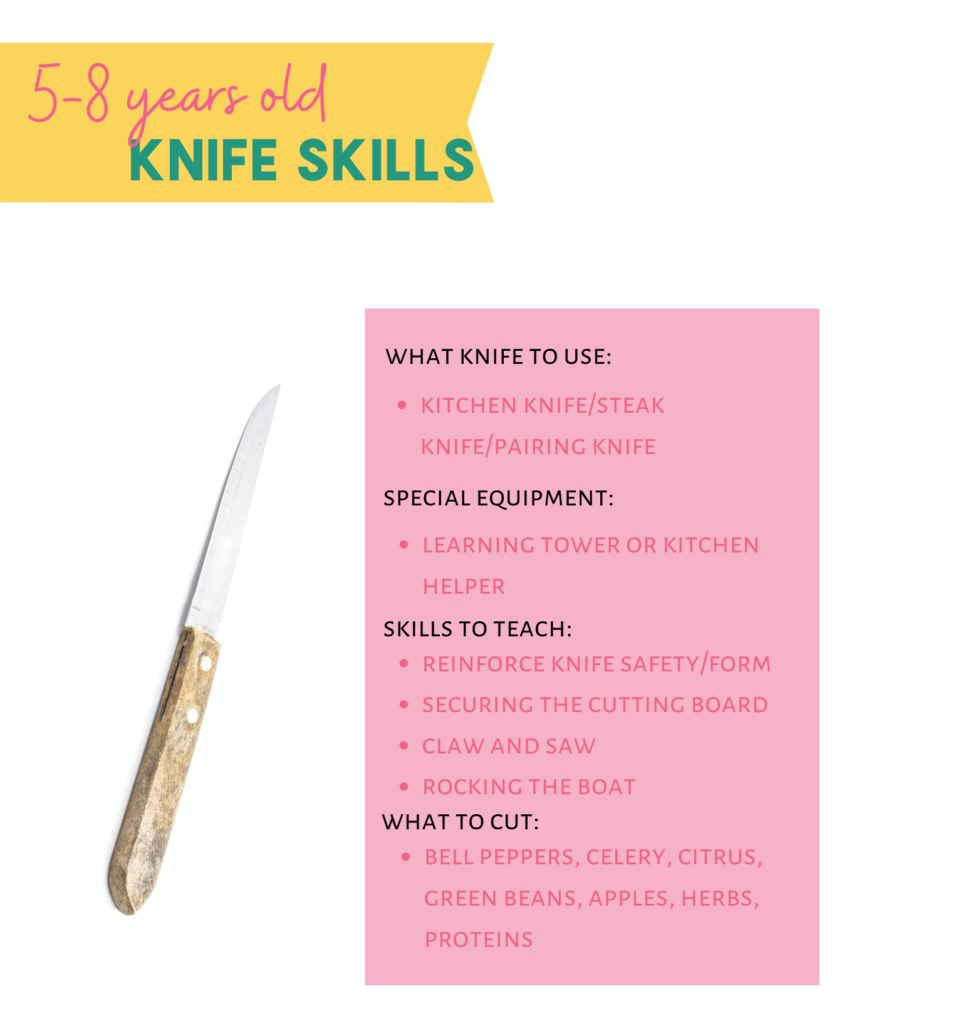
 Ages 5-8 years old:
Introduce a steak knife or butter knife where your child can start cutting harder foods. They’ll feel so grown-up and you might be surprised by their ability!
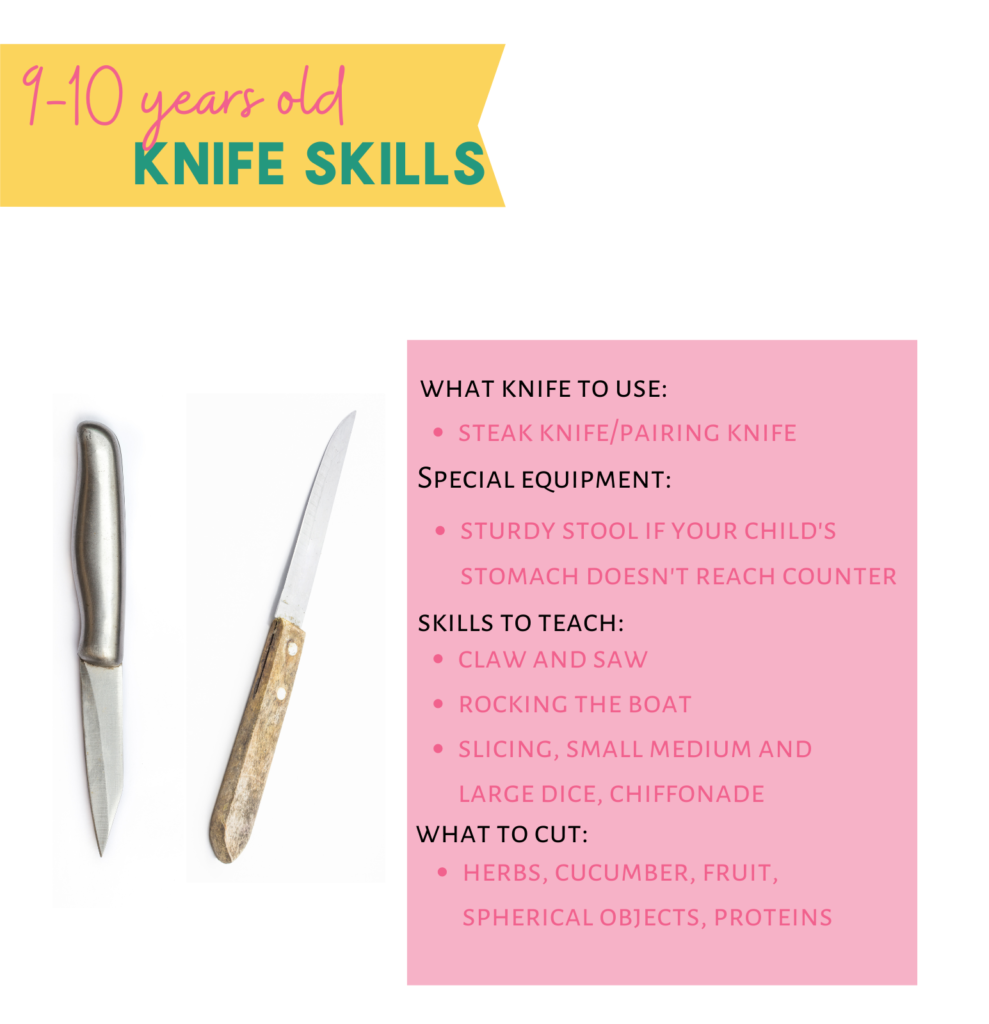
 Ages 9-10 years old:
Kids can use a paring knife and begin learning different cutting techniques at this age.
 Ages 11-18 years old:
Kids can use a small chefs knife and practice all knife skills. They can delve into more intricate cutting techniques, such as segmenting citrus and a chiffonade cut (think long, thin strips of green leafy vegetables or herbs).

It’ll be just a matter of time before your child is confident in the kitchen and excited to help prep meals!
If you need some fun kids recipes try these out:
Follow me on Instagram and tag #moremomma so I can see all the More Momma recipes you make with your kiddos.
Hi! The link for the Melissa and Doug knife isn’t working. Can you please update it? Thank you!
Fixing it right now! Thanks for letting me know!